You can avoid a lot of flooring problems by simply learning what to do and what not to do when installing the floors. Follow this guide to find out the most common installation mistakes — and how to best avoid them!
Mistake #1: Not reading the installation instructions
Flooring is a big investment and can result in expensive repairs if not done properly, so set 30 minutes aside to ensure you and your installer read the complete installation guide from your manufacturer.
HOW TO AVOID IT
- Read the manufacturer’s installation guide. This seems like a no-brainer, but 99% of installation errors can be avoided by taking 20 minutes to read the manufacturer’s installation guide. You will save yourself future headaches and keep from voiding your warranty. Need a Spanish version of the installation instructions? ¡No hay problema! (No problem!) You can download the Spanish version here.
- Read the manufacturer’s maintenance guide. To keep floors looking good for a lifetime, follow the manufacturer’s maintenance guide to ensure you’re cleaning the floor properly and protecting them from long-term damage.
Mistake #2: Improper acclimation
If you have a hardwood floor glued or nailed down and has started to shrink or change shape within a few months after installation, improper acclimation is one possible culprit.
HOW TO AVOID IT
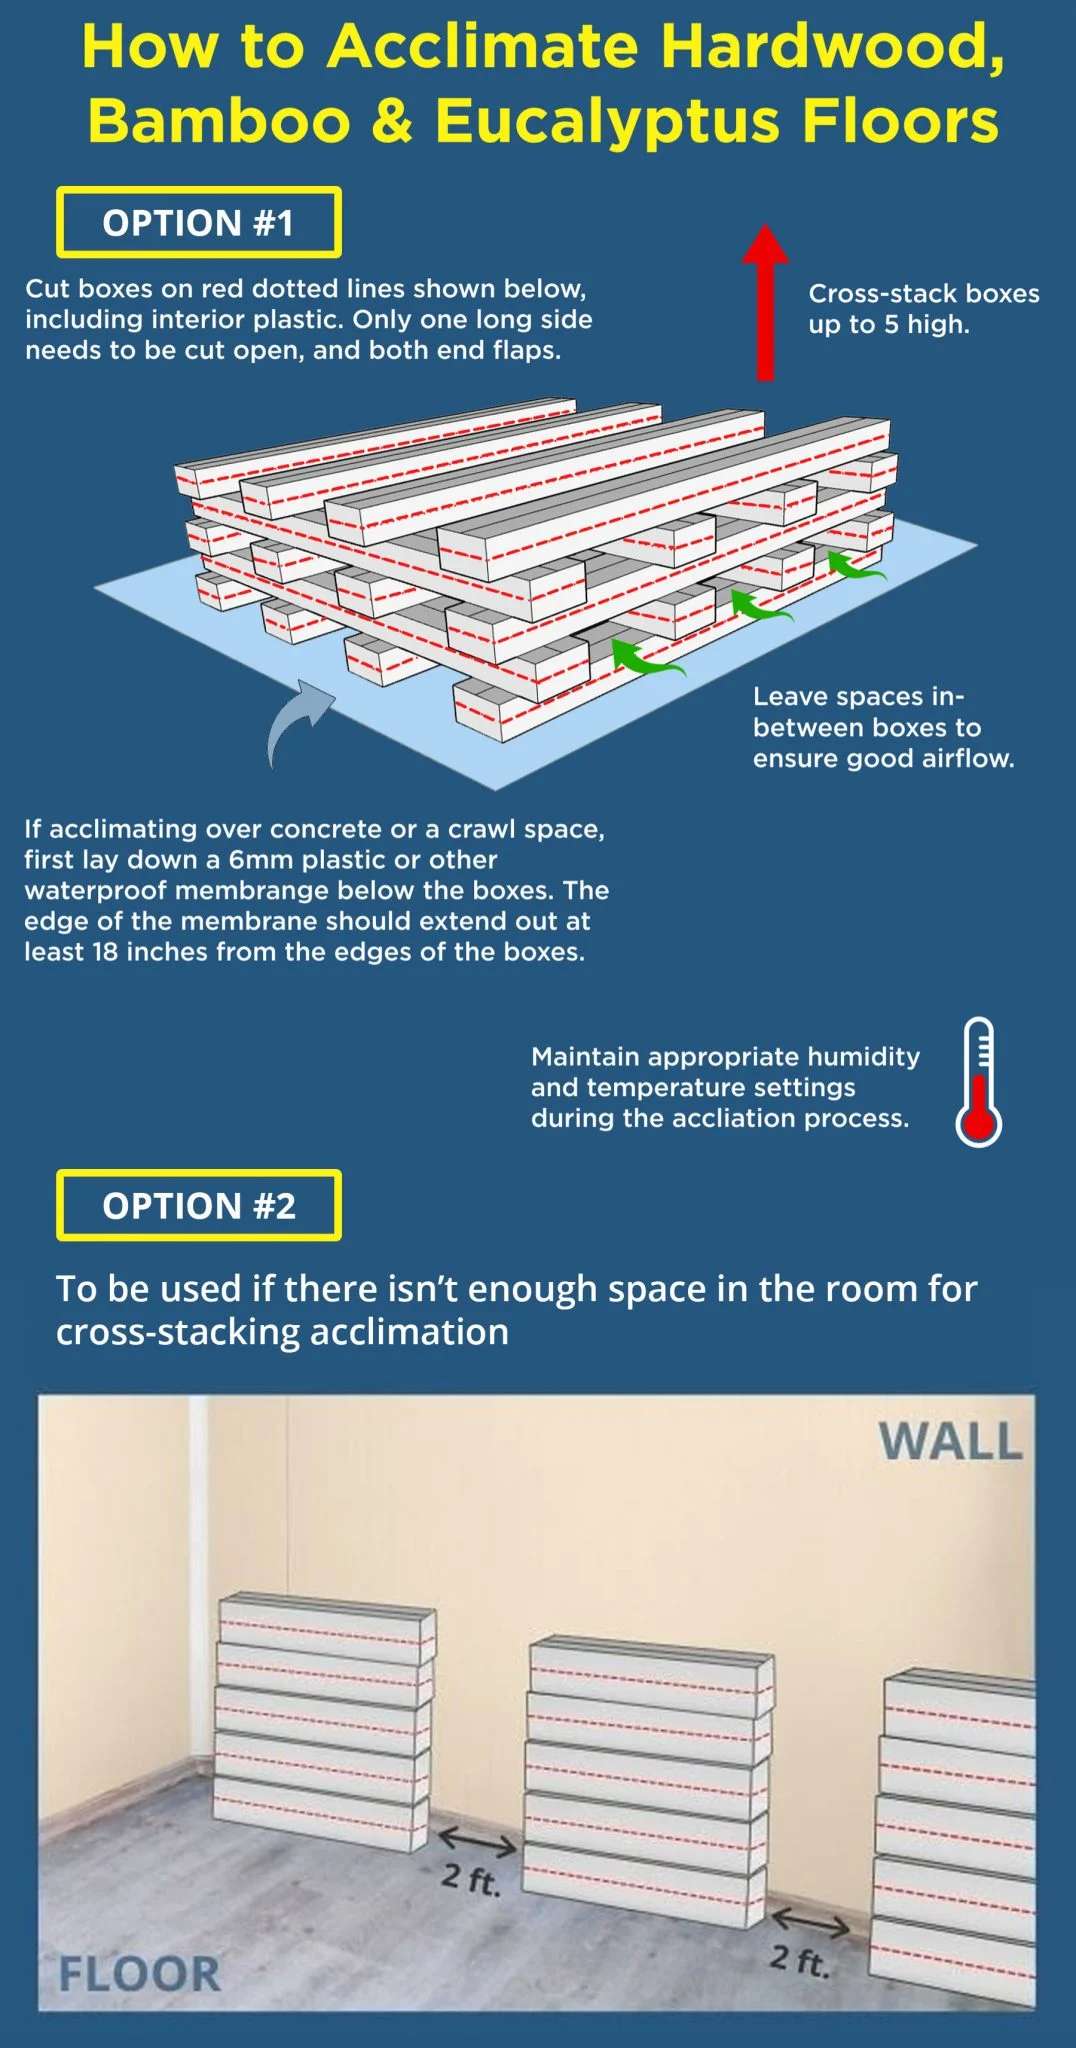
- Acclimate for at least 72 hours and make sure the boxes are prepared correctly. All bamboo and hardwood flooring must be acclimated to its environment before installation. Most high-quality bamboo flooring can be acclimated in as little as 72 hours, but if you live in a more dry or humid area, it’s recommended you acclimate for at least 10 days. Make sure to cut open each box down one entire length and the interior plastic, and do the same on the end flaps. Cross-stacking is always best; otherwise, be sure to leave at least 3 feet between your stacks to allow for adequate airflow.
- Always acclimate to the rooms in which the flooring will be installed, and make sure the climate control is turned on. Bring the boxes in to acclimate in the same rooms they’re going to live in. The climate control system must be turned on for at least 48 hours before bringing the boxes in to start acclimating and must stay on from that point forward. When floors aren’t acclimated to the environment they’re going in, they can experience all kinds of expansion and contraction problems. After installation of hardwood flooring, do not turn off the climate control system. Turning the climate control off for an extended period can result in further shrinkage or dry-cupping (also known as “the greenhouse effect”).
- Do not acclimate on top of concrete or over a crawl space unless sealed or unless you lay down a vapor barrier first. The moisture emitted by concrete and crawl spaces can cause warping after installation if not properly addressed. Make sure to first lay down at least a 6mm vapor barrier, extend an apron out at least 18 inches away from the boxes, and make sure the boxes are sitting on top of a pallet.
Mistake #3: Failure to properly seal a wet subfloor: water damage and/or buckling
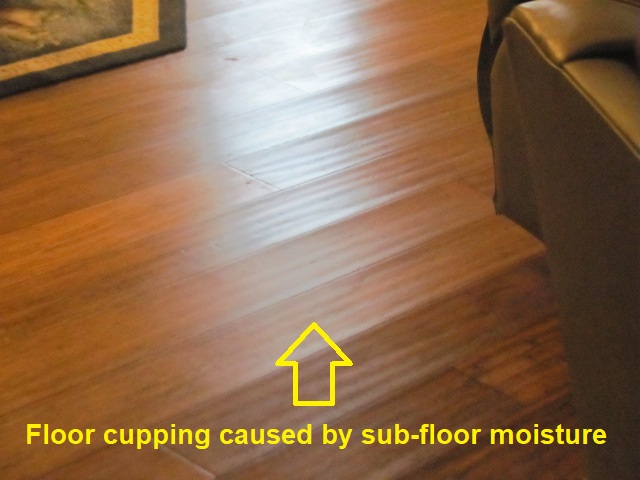
When installing hardwood flooring over a concrete subfloor, crawlspace, or other sub-floor that may emit moisture, steps must be taken to seal off the moisture to prevent damaging the floor. The failure to use a vapor barrier underlayment, using the wrong type of adhesive, or failing to apply the adhesive at a uniform and consistent rate, at the wrong thickness, or with the wrong trowel, are a few of the leading causes of hardwood floor cupping and water damage.
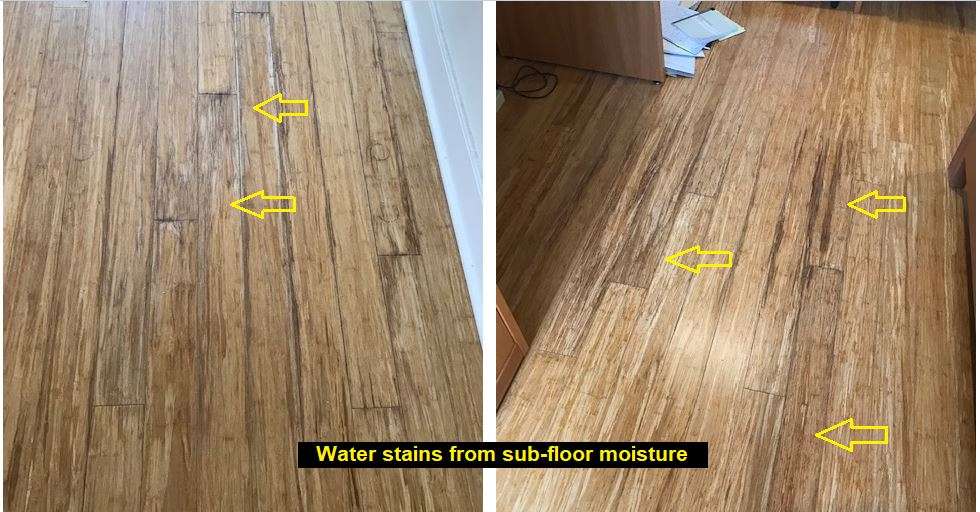
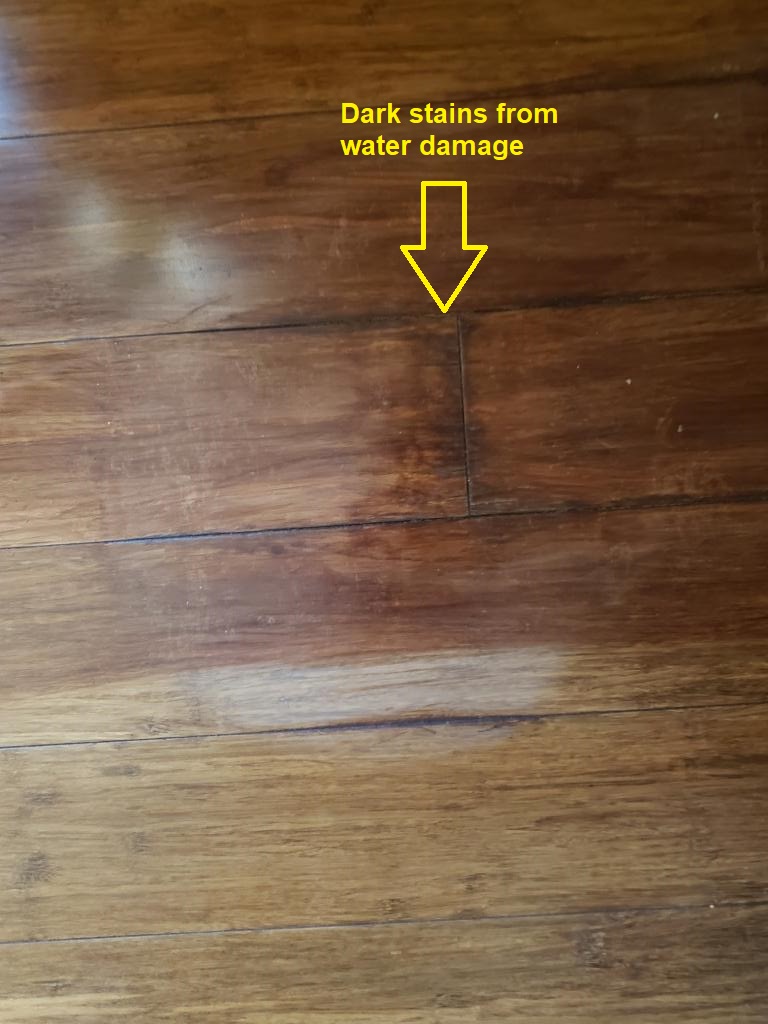
If sub-floor moisture is left unsealed it will begin to accumulate over time in the flooring planks, resulting in dark water stains, bubbling, cracking and even buckling due to the swelling of the planks.
HOW TO AVOID IT
If floating a floor, use a 3 in 1 vapor barrier underlayment. If gluing down to concrete, use a vapor barrier adhesive with its compatible trowel, and make sure to achieve 100% coverage of glue on the slab.
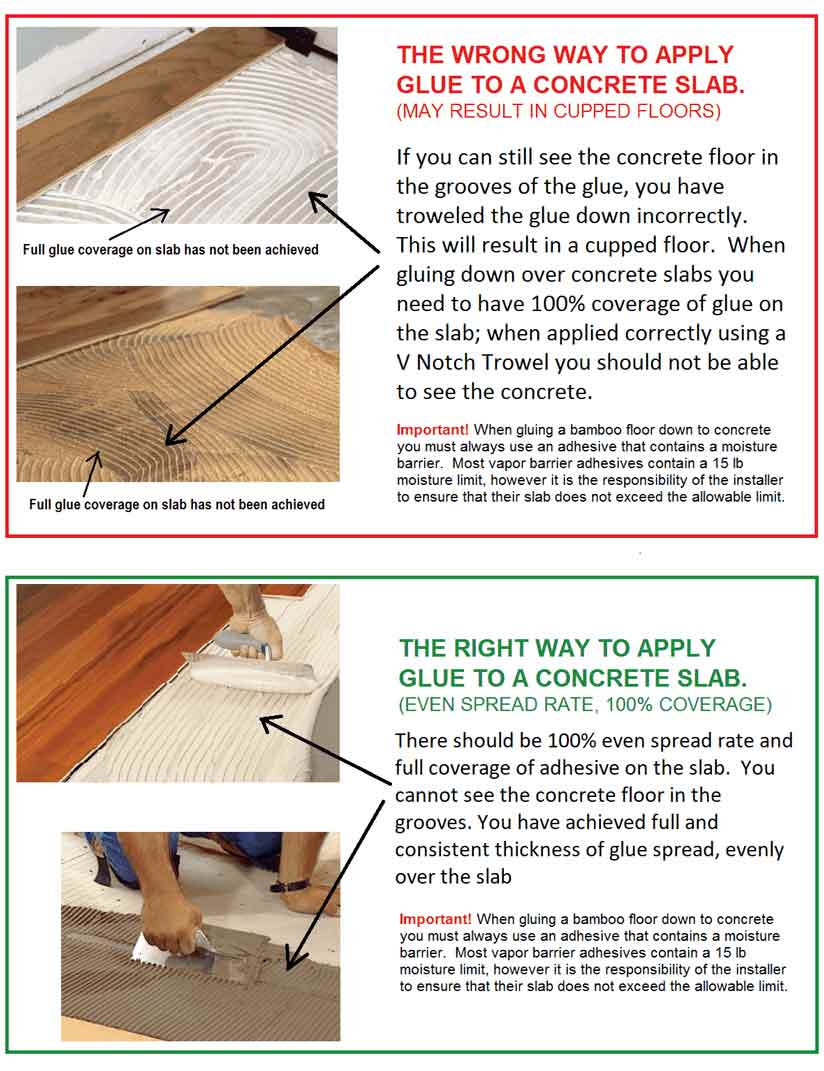
Concrete slabs continue to emit moisture for decades after being poured. If you don’t get 100% coverage/spread of the vapor barrier adhesive on the slab, the gaps in the glue will allow the moisture to come up, and voila – the cupped floor! Furthermore, using the wrong trowel – or misusing the trowel – can result in less than 100% coverage of the slab’s glue. See the diagram below for a representation of good vs. bad troweling.
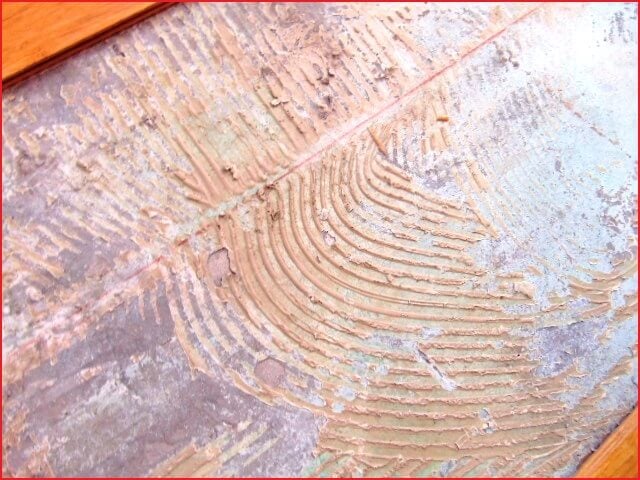
Example of using only 20% glue coverage on a slab resulting in cupping.
- Perform a calcium chloride test. Most installations over concrete only require a vapor barrier glue with a 15lb upper moisture limit, but some slabs emit more than 15lbs – and it’s the installer’s responsibility to determine if the adhesive being used has a moisture limit that is suitable for the specific slab they’re installing over. So do yourself a favor – always test the slab first! If the vapor emissions are above 15 lbs, you may need to upgrade to a glue that provides an unlimited moisture limit (more expensive, but preferable to thousands of dollars in repairs).
Mistake #4: Floating a floor over long distances, without stable humidity
If you have a long run on your floor, floating hardwood floors should only be installed in homes with stable indoor humidity. If in doubt, always glue down or nail down a floor.
HOW TO AVOID IT
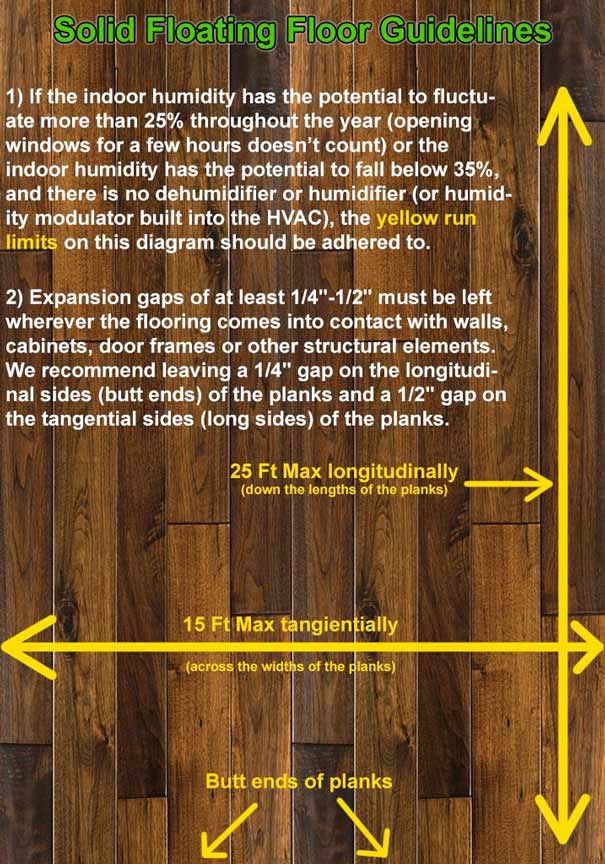
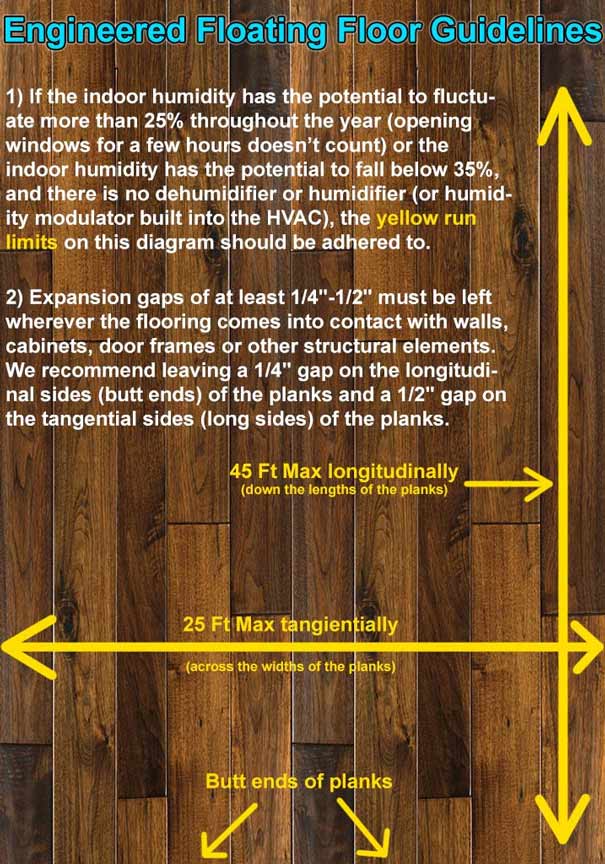
- Only install solid floating floors in stable humidity environments. Like hardwoods, bamboo will change shape slightly depending on the humidity. These effects multiply and then radiate out to the edges of the installation and at doorways on floating floors. One of the most common problems experienced by homeowners is related to their solid floating floors shrinking when the humidity drops. If the indoor humidity isn’t stable year-round (within the same 20% range) and you want to install a solid floating floor, be prepared to install transitions/breaks every 15 feet across the widths and every 25 feet down the lengths.
- Engineered bamboo flooring is more forgiving. If the home doesn’t have stable humidity, you can install engineered floating bamboo floors, which provide for increased run limits of 25ft across the planks’ widths and 45ft down the lengths of the planks.
- If your runs are longer than 15ft wide by 25ft long, opt for an engineered floating floor, or be 100% safe and use glue down or nail down flooring. The big advantage to a glue down or nail down floor is that there are no limits on the successive distances (aka “runs”) of flooring. If the humidity drops below normal, you’ll get small gaps that develop between the planks (normal behavior for hardwood floors).
- Do your research about the bamboo brand you’re considering. Always do your homework online about the brand you’re considering. Check for complaints and honest reviews on sites like Yelp, Google, and BBB before making a purchase. Stick to a reputable flooring brand to avoid shrinkage, cupping, and many other problems that plague low-quality brands.
Mistake #5: Letting glue dry on top of the planks/finish
Flooring adhesives are notoriously strong and can even hold a car to a wall, so don’t let the glue dry on top of your flooring planks, or you’ll be left with cloudy spots where the top coat of the finish used to be.
HOW TO AVOID IT
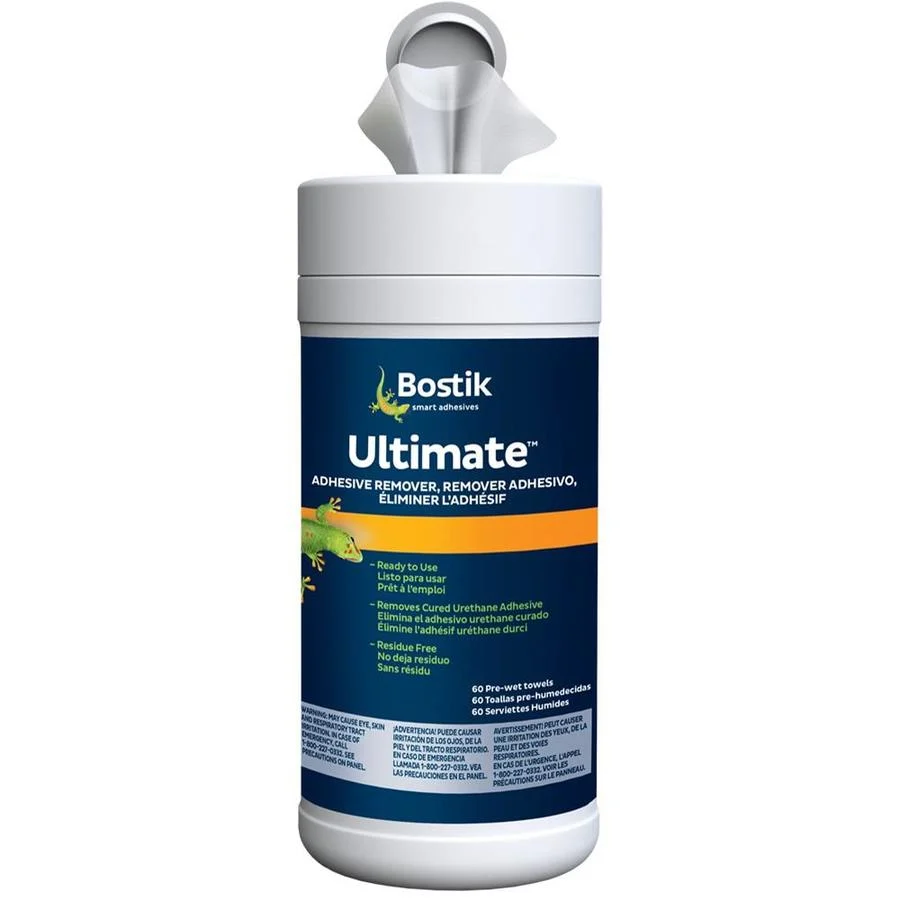
- Use adhesive remover wipes to clean up the glue while it’s still wet. Be sure to use the wipes to clean the glue up as the floor is installed while the glue is still wet! If the glue cures on top of the plank it can then be impossible to remove and often result in stripping off the finish’s topcoats, which will leave cloudy marks.
Mistake #6: Using the wrong cleat size or improperly set cleats when nailing strand bamboo
Strand woven bamboo flooring is by far the densest and hardest wood flooring on the market and requires properly set 18 gauge cleats when nailed down. Please note the same features and requirements apply to strand woven eucalyptus flooring.
HOW TO AVOID IT
- Only use 18 gauge cleats. There’s a reason why strand floors are the hardest wood floors in the market – because they’re really dense. And this is why using a cleat size larger than 18 gauge may result in dimples on your floor. Always opt for an 18 gauge cleat nailer (using, you guessed it, only 18 gauge cleats) when installing strand bamboo.
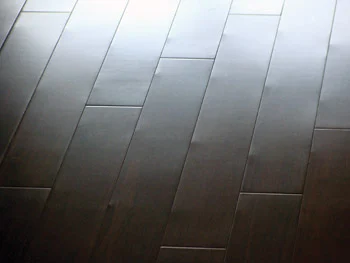
Courtesy of Wood Floor Business Magazine
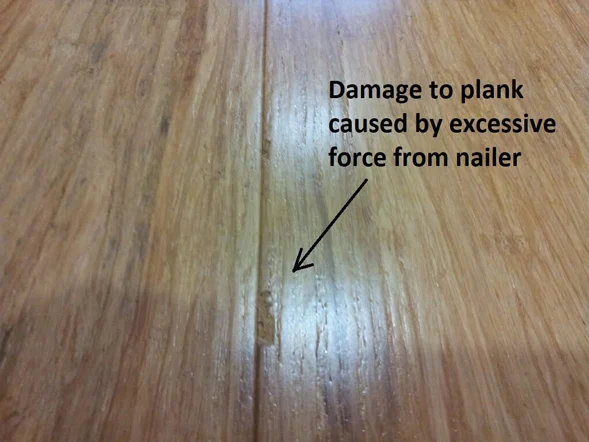
- Ensure that the nail gun has the proper PSI setting. Please test it out on several sacrificial planks until you get the exact right pressure setting. This will prevent splitting of the tongue, dimpling, and damage to the planks from excessive force. After each row is installed, check to ensure the cleats and nails are set properly before continuing to the next row. Take care when using the gun because swinging the mallet too hard or using abnormally high-pressure settings can result in damage to the planks where the nail is driven in.
- Rent a high quality 18 gauge nail gun. Problems can arise if the gun is not set properly, if the installer is leaning too far forward, if the hoses connected to the air compressor have leaks, or if the firing mechanism is compromised. We recommend renting a Primatech Q550 ALR, which in our opinion, is the best 18 gauge pneumatic nailer on the market. Some customers have reported positive results also with Powernail 50P Flex nailers.
- For moldings & trim, use a 23 gauge micro pin nailer. Strand bamboo moldings are just as hard as their flooring counterparts.
Mistake #7: Using mineral spirits or other abrasive cleaners
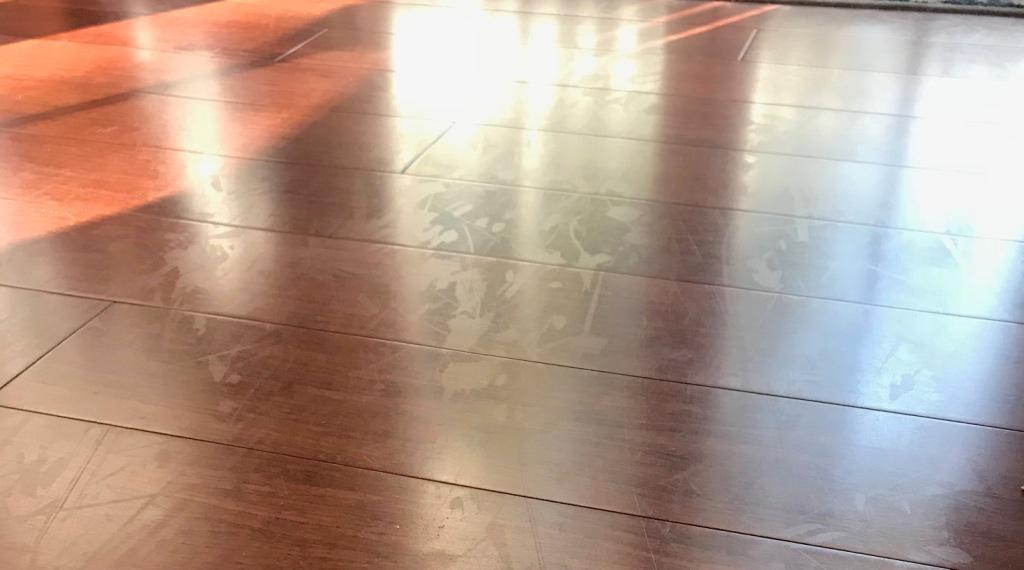
Avoid turpentine, mineral spirits, paint thinners, and other abrasive cleaners on polyurethane finished hardwoods unless you like cloudy spots on your floor, as these abrasive cleaners can strip finish topcoats.
This photo shows permanent cloudy spots on polyurethane finish that was cleaned with mineral spirits.
HOW TO AVOID IT
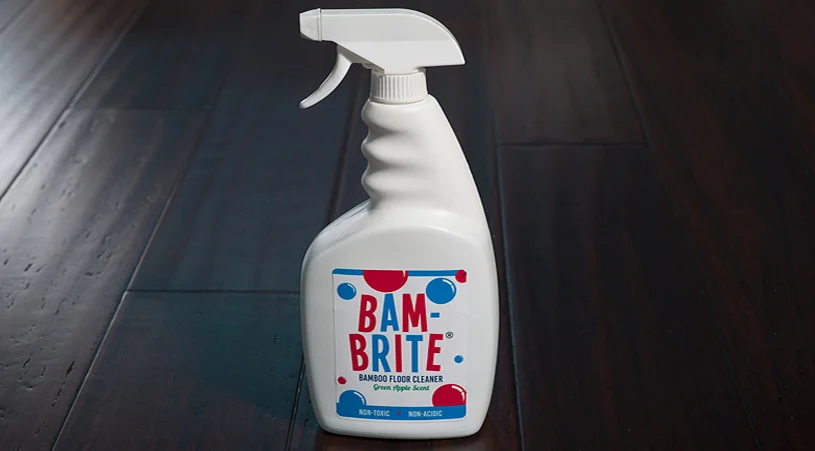
- Avoid mineral spirits and other abrasive cleaners. Most bamboo floors come with UV-cured urethane finishes (polyurethane), which can be damaged by mineral spirits or other abrasive cleaners. When cleaning up glue, always use Bostik Ultimate Adhesive Remover Towels. For general cleanup, use an approved bamboo cleaner (like Bam-Brite® Bamboo Floor Cleaner) or test your specific cleaner on a sacrificial plank to ensure it doesn’t dull or damage the finish.
Mistake #8: Failure to properly seal a crawl space or other unconditioned space under the subfloor
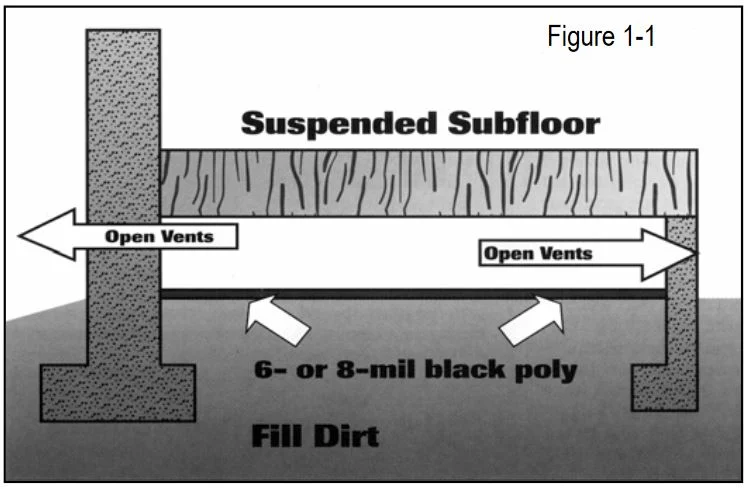
The Internet is loaded with examples of hardwood floors installed over crawl spaces that are cupping, sometimes within just a few weeks of installation. In most cases, the cupping is a result of the moisture being emitted from the ground in the crawl space. This problem needs to be addressed at the source — crawl spaces and unconditioned spaces need to be sealed to protect hardwood floors from moisture before acclimation.
- The crawl space should be a minimum height of 18 inches from the ground to the joists’ undersides.
- Crawl space earth (or thin concrete slab) should be covered 100 percent by a vapor retarder of black polyethylene (minimum 6mm) or any recommended puncture-resistant membrane, such as Class C, meeting ASTM D-1745.
- A proper ground covering is in place. When local building codes require venting, the crawl space should have perimeter venting equal to a minimum of 1.5 square feet per 100 square feet of crawl space square footage, unless local building codes differ from this specification. Note: Local-building codes may differ. Always follow local building codes.
- For crawl spaces without ventilation openings, vapor retarder joints must overlap a minimum of 6 inches and be sealed or taped. The vapor retarder should also extend at least 6 inches up the stem wall and be attached and sealed to the stem wall. Continuously operated mechanical exhaust and perimeter wall insulation or conditioned air supply and insulation must be provided.
When warm, humid weather rolls in, the problems are compounded. Crawl spaces are usually below grade, shady, and are naturally cooler than the outside air. When the warm, moist outside air blows in the crawlspace through vents or other air leaks, the moisture in the humid air condenses on the cooler surfaces just like water condenses on a cold glass of ice water sitting on your counter. In extreme, but not uncommon cases, so much water condenses that it begins dripping off the surfaces to collect in the bottom of the crawlspace. Hardwood floors cup because of excess moisture drawn up through the bottom of the floor-board, while the top of the flooring remains relatively dry by comparison.
Having a flooring problem that you think may be caused by an installation error? Please feel free to let us know in the comments section below!
Installing Bamboo Flooring Over Concrete
Make Sure You Use the Right Glue and Tools
Choose an adhesive with a moisture limit that is compatible with the amount of moisture being let off by your concrete. When installing over concrete, this seals the concrete and protects your floor from moisture. The next most important tool is your trowel. You want a trowel that has been designed to work with your adhesive. If you’re not sure, check the label on the flooring glue bucket, or call your flooring manufacturer. It is crucial to maintain the correct spread rate on the slab, so moisture isn’t allowed to seep through and cup your floors.
Clean Your Slab, Make it Level
Your concrete slab may be cured, but that doesn’t necessarily mean it’s clean. So before you do anything else, please give it a thorough sweeping or vacuuming to get up any dust and debris. Depending on how dirty your slab is, you may have to give it a good scrub with soap and water. If you need to scrub it, give it another 24 hours to dry before installation. Most importantly, your slab must be level before installation, whether through the use of a self-leveling compound or from grinding down bumps.
Determine Your Starting Point
Don’t start spreading the glue all over your floor until you determine the best starting point regarding any step-downs where stair nosings may be needed and other site-specific considerations related to moldings and flooring plank direction. If you’re gluing down the floor and decide to take a break longer than 6 hours or continue the next day, remember not to leave glue too far out under the last plank. When you come back to start gluing planks the next day, if the glue is too far out from the bottom of the plank, you won’t be able to slide the next plank in to continue your installation! And keep in mind that wood and planks are usually laid parallel to the longest run in the installation.
Starting Spreading the Adhesive
It’s important to mention right off the bat that most adhesives dry in less than a few hours, so you never want to apply more than you‘ll be able to cover in that time. That doesn’t mean you should skimp on the adhesive because you shouldn’t. It simply means only covering small sections of the floor at a time but using a liberal amount of glue in each section. Furthermore, using the correct trowel is crucial to ensure the proper spread rate and coverage on the slab. Once you’ve spread some glue in your starting point, go ahead and scrape the top of it with the notched side of your trowel. This creates grooves in the glue and helps your planks grab hold. Make sure to use adhesive remover towels to wipe up the glue off the top of the planks as you’re laying the flooring so none of the adhesives gets on top of your planks. If the glue dries on top of your planks, it will ruin the finish.
Use Spacers
It’s essential to use spacers when gluing down a floor because, without them, each row you lay down will push up against the first row, and then your first row gets squeezed up tight against the wall. If you were laying down your floor over a plywood subfloor, you could nail the first row in place. But since you can’t, you must use spacers every six inches along the planks to ensure the first row will stay in place.
Mind Your Expansion Gap
After you’re done laying your first row, and you’ve come to your last plank, you’ll want to measure the distance between your last plank and the wall and then subtract ¼” – ½” for the expansion gap. Saw this piece off your last plank and then lay it down.
Create Random Seams
Perhaps you’ve noticed other wood floors have used a random pattern when it comes to the seams. Bamboo and eucalyptus floors look more natural this way. To achieve this look, you’ll want to start your second row by placing a longboard beside a short one and vice versa. Once you’ve finished this second row, use a tape for delicate surfaces and tape across the seam between your first and second row to hold them in place while your adhesive dries. You’ll repeat this process throughout the room, making sure to use those adhesive towels to wipe excess glue that has squeezed between the boards. Once all of your boards are down, taped, and wiped, allow the adhesive to dry for 6 hours.
Allow drying for 6-10 Hours
Once your floor is arid, you can nail your baseboard to the bottom of your walls to cover those expansion gaps. You did make sure to cut with consideration for those gaps, right? Once that’s done, the only thing left to do is show off your new floors and take all of the credit.
Can I install hardwoods in a bathroom?
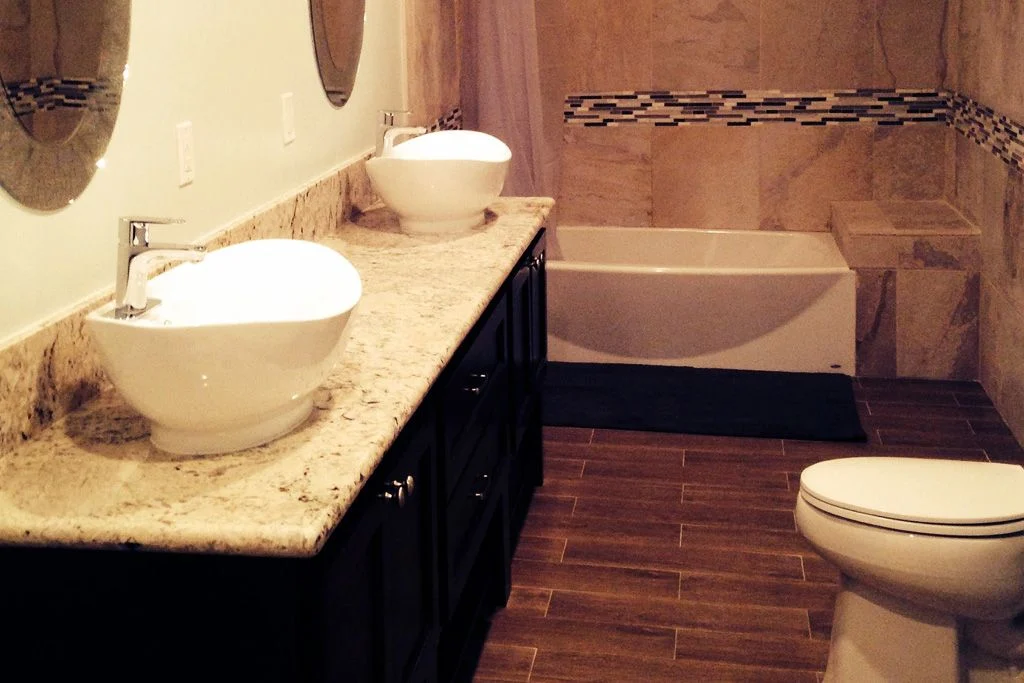
Hardwood flooring (and bamboo) can be installed in powder rooms (half-baths) with no problems, and in full bathrooms as long as they are properly protected from moisture.
1. Most bamboo and hardwood floors aren’t waterproof
With the exception of rigid core waterproof bamboo flooring, most bamboo and hardwood flooring isn’t waterproof. The organic structure of wood and bamboo means it can warp and become unstable if it takes on excessive moisture. Bathrooms are privy to all kinds of water – standing water, humidity (steam), and often condensation on shower screens or windows. All of these can cause damage to wood flooring.
2. Damage from standing water
If excessive moisture is allowed to remain on the floor, you should expect some discoloration to occur. We define excessive moisture as any large amount of water extending over the edges of the planks left on the surface of the floor for more than 20 hours. This could come from a puddle on the floor (perhaps hidden away behind a washbasin) or from wet towels or bath mats being left.
3. Humidity damage
Many manufacturers recommend maintaining a humidity level between 40-60% to ensure longevity. Unless you fancy taking short, cold showers for the rest of your life, your bathroom is going to be regularly exceeding that 60% upper limit. Steam and condensation in the air goes down into the cracks between the flooring and penetrates every space. Only a small amount will enter the flooring, but over time this builds up and can result in the planks buckling, warping, or cracking.
4. Chemical stains from bathroom cleaners
Most cleaning products have some acid in them to aid the cleaning process. Even natural products are often acidic in their make-up. If these frequently come into contact with the wood floor and aren’t wiped away completely, they can cause discoloration and damage the protective finish.
5. Mold and mildew damage
Mold and mildew are a common problem in bathrooms due to the combination of high temperatures and moisture. These compounds love organic materials such as wood, as it provides them with a rich base on which to grow. Mold and mildew can eat away at the protective layer of the floor and seep into the cracks, growing between the planks and underneath them., and you may not even realize it’s there. Over time, untreated mold and mildew can not only damage your flooring but become a health hazard too.
6. Leaking appliances or floods can ruin the floor
If your vanity, toilet, bath, or shower leaks, your floors may suffer a bit. With more traditional bathroom floor materials such as tile, you may be able to take them up, replace the underlay material, and then put the tiles back in place. However, the sheer amount of water will saturate the wood and cause it to expand and warp, and most likely damage the finish.
7. No product warranty for bathroom installation
Many wood flooring manufacturers have clauses in their terms and conditions that state that the warranty on the product is void if you install the flooring in a bathroom with a shower or bathtub. You may be liable for any damage that incurs and will need to self-fund any fixes or replacement materials.
Tips for installing hardwoods in your bathroom
Here are some of the top tips for using hardwoods and bamboo in a full bathroom. Note that none of these tips can guarantee that your floor will remain undamaged.
- Install a tile or stone apron around bathtubs and by showers.
- Use cotton rugs or bath mats around your bath, sink, and shower to absorb moisture. When you’ve finished in the bathroom, hang the mats on the side of the tub (or better yet, outside the bathroom) to dry. You don’t want wet or damp mats sitting on your floors for hours as that could cause permanent damage. Make sure that the mats are breathable, or have a breathable rubber pad underneath. Trapping moisture under a rug will ruin a wood floor surface. Some rug material itself, such as jute, needs a pad underneath as repeatedly walking on a jute rug will wear away the flooring finish.
- Use natural, non-acidic bathroom cleaners. When washing the floor, dry wipe where possible – do not use a mop and bucket of water as that will be far too wet for the floor.
- Dry the apron in front of the shower and tub after every use with a towel or water scraper to limit moisture left in the room. You should also thoroughly dry the rest of the floor.
- Install a ventilator in the bathroom and keep the window open regularly. Note that this is not enough to guarantee your floors will not be affected by moisture and humidity, but it may slow the damage.
- Regularly inspect the flooring for signs of damage. Seek immediate remedial action if you notice any issues with the floor. This may include adding another protective layer on top of the floor or replacing a piece of bamboo that’s become damaged.
Here’s a cool video a homeowner made of floors in their bathroom:
Can I Install Bamboo Flooring in a Basement?
Yes, you can install bamboo flooring in a basement. It’s recommended you use engineered bamboo in basements since it’s more stable, and can be easily installed via the floating method and even over concrete. Bamboo is well-suited to handle changes in moisture levels.
Engineered bamboo flooring is the the best choice for flooring in basements because:
- It’s easy to replace if your water heater leaks or you have another common basement water issue.
- It’s resistant to moisture and humidity.
- It’s more dimensionally stable than solid floors.
- It’s easy to install over concrete.
- It comes in a wide range of colors and styles that will suit any decor.
Engineered bamboo flooring (floating installation) is made using fiberboard or a multi-ply base and an excellent wear layer of strand bamboo. There is a wax layering on the click design all the way around the plank that helps prevent water from getting below the planks and possibly growing mold.
In addition to high-density fiberboard (HDF) or multi-ply eucalyptus plywood cores, engineered bamboo also employs the strength of strand bamboo, one of the hardest wood materials in the world according to the Janka Hardness Scale. Basically, in a fight between engineered bamboo and Batman, Batman would lose.
1. If gluing down, test your basement floor for moisture levels
The first thing you should do before installing bamboo (or any hardwood) floors in your basement is to check the current moisture levels over a period of 72 hours. This will help you determine if you need to do anything (i.e., putting in place a vapor barrier) before installing your floors on top of concrete.
These tests are pretty easy to complete and it doesn’t cost a lot either. If you are concerned about the stability of moisture levels in your basement, then you may want to consider getting a basement humidifier.
2. Acclimate your floor to the room
Once you’ve done the moisture test, you should already have read the instructions manual about how long you need to acclimate the flooring to the basement before installation.
It’s a crucial process that you shouldn’t skip because it will help to make sure that your floors won’t buckle or bow due to humidity in the years to come.
The method is simple. All you do is clean the basement in preparation for the installation, close all outside windows and doors, and unwrap the planks from their plastic wrap. Then leave the planks for the period of time noted in your test results – a minimum of 72 hours – before installing.
3. Read the installation guide
Not reading the installation guide is one of the biggest and most common mistakes people make. Furthermore, do your research and read online reviews about the flooring brand you’re considering using because there are some ubiquitous brands out there known for having quality issues. Use a trusted brand with a good reputation.
This way, if something goes wrong with the flooring while under warranty, you’ll be able to get your money back or have it replaced for free unless you did something to cause the damage.
Sometimes, manufacturers will warn against installing their floors in a basement, and if so, you should definitely not install them there.
What are the main problems with installing any floor in a basement?
Basements often have higher humidity levels than the other rooms in your house for several reasons. The cause for the elevated humidity levels can be from moisture seepage from the soil, the location of water heaters and washing machines, and even a lack of open windows.
This added humidity can create a moist environment in your basement, which can cause all sorts of problems for the average floor, from warping to staining to mold.
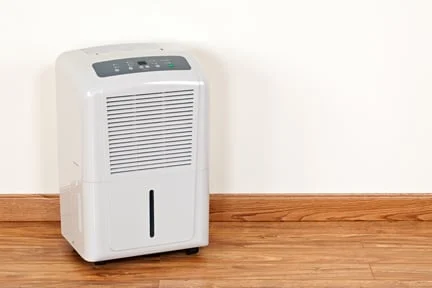
It would help if you tried to control humidity levels in your basement by doing things like opening your windows, immediately cleaning up any spilled water, and using a dehumidifier.
Can I refinish engineered bamboo floors?
The highest quality brands of engineered flooring contain a thick wear layer that can be sanded down and refinished two times.
Furthermore, it’s doubtful you’ll ever need to refinish stranded bamboo in your lifetime. Another benefit is that if you’ve installed your engineered planks using the click-lock method, you can easily remove and replace individual planks that may have been damaged without needing to refinish the entire floor. This is particularly useful in localized occupational flooding, i.e., an overloaded washing machine from a 70s sitcom.
Can I install bamboo flooring in a dry, or humid, climate?
Yes, bamboo can be installed in dry, desert-like areas, and humid, tropical areas.
Whether you live in a desert or a tropical climate, keeping your home’s interior a climatic oasis is easy with the right tools. Wood floors expand and contract naturally through the changing seasons due to the changes in humidity. There’s no way to avoid that when you use wood products in your flooring, whether you have bamboo or another type of hardwood. Remember, the humidity levels outside are often very different from your in-home levels because HVAC systems stabilize humidity levels. To keep an eye on your indoor humidity, you can use a hygrometer.
- Desert or Dry Climate: In many deserts, outdoor humidity might average about 35-40% year-round. However, during an arid desert’s winter season, humidity levels can drop to 10-20%. That dry air can take a toll on hardwoods if it gets too dry (think below 20% humidity). If you see the interior humidity start to drop below 25%, consider investing in a humidifier. A smart, programmable home humidifier is the perfect solution. Select a portable model for the convenience of moving it where you need it and storing it out of sight when the dry season is over.
- Tropical or Humid Climate: These climates are actually very suitable for bamboo because they have relatively stable humidity year-round (even if it is higher than normal). As long as you acclimate to the flooring for 14 days, you’ll rarely experience any issues with bamboo in a humid climate. If it gets too wet, you’ll notice the boards will expand, and two planks might “tee-pee.” When this happens, it’s easy to find a smart, programmable dehumidifier, or you can cut in extra expansion gaps at the sides of the planks where they’re pushing up against the walls.
Humidity control automation is also an option. A whole-house humidity modulator or humidistat will cost more than purchasing a portable device, but many homeowners think it’s worth the cost. Also, HVAC professionals offer many options for integrating humidity controls into a home’s air quality control system. Chances are, there is one that fits your household budget. An automated system means the humidity is controlled even while you sleep or are away on vacation.
Acclimation Is Key
Another key ingredient to a successful installation of natural flooring in humidity extremes is acclimation. This needs to happen right out of the box, so to speak. When your flooring arrives and you’re ready to acclimate, remove the stacks of planks from their packaging and cross-stack them to receive better airflow; those planks need to breathe. Then, leave them be for at least 14 days. This will allow them to adjust to the humidity level of the room where they will be installed.
Installation Method
The next critical factor for natural flooring success in an environment of climate extremes is how the flooring is secured. Although some projects use a nail down method, the glue-down method is recommended in dry or humid geographies. Many adhesives have an elastic quality that allows for natural expansion and contraction. It also acts as a protectant against moisture seeping up from subfloors (as long as you get an adhesive with a vapor barrier mixed into it). Another benefit to the glue-down method is that it has a sound-dampening quality, acting as another insulation layer that helps to absorb and muffle the sounds created when feet or objects move about upon the floor.
Leave Expansion Gaps
As you prepare to glue down planks, remember that there is no stopping Mother Nature. That means the expansion/contraction process will occur throughout its lifetime. Give it room to breathe. Although carpet may be a wall-to-wall installation job, wall-to-wall doesn’t work for bamboo. Your bamboo needs some personal space, as in a ¼” to ½” gap around the entire perimeter of your flooring installation area.
What Humidity Does – Dry and Wet
When recommended humidity levels are not maintained, the natural expansion and contraction of wood flooring become more pronounced. High humidity can cause excessive expansion, with planks not having enough room, resulting in slight lifting/buckling of the floor planks. Arid conditions cause contraction. Gaps between planks are the most common signs of an interior environment that has become dry, and these gaps are considered normal in hardwood floors.
Interior Humidity
Keeping your home’s humidity within the recommended range of 35-55% is helpful. Throughout the year, seasonal changes may cause fluctuations in interior humidity. Preventing a major fluctuation of more than 25% over a 48 hour period is important, but don’t let this discourage you as interior humidity is often more stable than you think. That’s why bamboo is being successfully installed and enjoyed in homes found in Kenya’s tropical jungles and the high altitude deserts of the Rocky Mountains.
Remember this advice from our friends at the National Wood Flooring Association:
How To Prepare Your Subfloor To Avoid Problems
Step 1: Adjust the Temperature and Humidity
Before you start installing, you’ll want to allow it to acclimate to the normal temperature and humidity of the room. Before starting your subfloor preparation, bring the flooring into the room and ensure that the room is at its normal year-round temperature and humidity. This will ensure that the flooring is properly acclimated before you start the installation process. It will ensure you don’t have to wait several days for the bamboo planks to acclimate after preparing your subfloor. Ideally, your flooring should acclimate for at least 72 hours before installation.
Step 2: Make Sure the Subfloor Stays Dry
You must have a subfloor that will stay dry year-round. If you have a wood subfloor, make sure that the moisture content does not exceed 12%. A concrete subfloor requires less than three pounds of moisture emission per square foot, and you must use a 3-in-1 underlayment under a floating floor. If you’re wondering, “Do I need underlayment for bamboo flooring?” For a concrete subfloor, yes, you do. You’ll need an adhesive with a moisture barrier if you’re gluing the floor down. If you’re concerned that your subfloor emits a lot of moisture, perform a calcium chloride test to determine how much, and if you’re gluing down the floor, make 100% sure that the adhesive you’re using has an upper moisture limit that can handle the moisture level of the subfloor.
Step 3: Secure Your Subfloor
Your subfloor must be secure, tight, and free of squeaks. Now is the time to fully examine every part of your subfloor to make sure that it’s secure. This includes:
- Checking nail or screw placement on the subfloor to ensure they’re tight, and add new long screws where squeaky (You should have a nail or screw placed every 8″ along the joists to avoid problems with squeaking.)
- Replacing any boards that have rotted or broken down over time
Step 4: Level the Subfloor
You don’t want your subfloor to have any buckling or raised spots because they can cause installation and daily use problems. Therefore, your subfloor must be flat and level.
Sand first. Start by sanding down any raised spots across the subfloor. Make sure that it is flat to 3/16” within a 10-foot radius. When you’re done, you must clean away the dust since dust beneath your flooring can cause future problems.
Fill in dips or other spots that are too low. Use a self-leveling compound for your low places, and smooth it into place along with low spots with a putty knife. The compound should have the approximate texture of pancake batter when you put it in place.
Allow the compound to dry. Use the time recommended by the manufacturer’s instructions to be sure the compound is completely dry. Test it for dryness before proceeding; if it’s not dry, wait before moving on to the next step.
Sand rough spots in the compound. Make sure it remains level by checking with a contractor level before proceeding to the next step.
Clean up any dust created by your sanding. Make sure that you haven’t left a mess!
Concrete Subfloor Concerns
If your subfloor is made of concrete instead of wood, it must be properly prepared. First, make sure that it has been cured for at least 60 days before beginning your installation. This will ensure that the concrete is arid and settled before you install the flooring.
Step One: Sand and Level
Use a sander for sanding the concrete floor flat and level. A contractor’s level will allow you to determine whether the flooring is level across the room easily.
Step Two: Double Check Moisture
There are several methods for checking the moisture contained within the concrete subfloor. The easiest way, however, is a calcium chloride test. You can also tape down a two-foot by two-foot square of plastic over your concrete floor and leave it for 48 hours. If there’s moisture beaded on the inside of the plastic, continue to Step Three below.
Step Three: Install a Moisture Barrier If Needed
If you’re struggling with the moisture levels in your concrete, you’ll need to use a floating floor over a 3-in-1 underlayment or glue the floor down using an approved urethane wood floor adhesive with a vapor/sound barrier. This will prevent mold and mildew growth, and it will keep the bamboo planks from being ruined by the subfloor moisture.
Installing Bamboo Near a Fireplace or Stove?
High heat, like that which comes from wood stoves, fireplaces, and other heat-producing sources throughout your home, can dry out your wood floors:
- Large gaps can develop between the boards in your installation.
- Cupping and checking
- Possible buckling
By taking care with how you install your flooring, you can help protect your floors from damage and keep them looking better long-term. That may mean keeping your floors away from extreme sources of dry heat, including fireplaces and wood stoves.
So how do I install hardwood and keep my wood stove?
If you have a wood stove or fireplace and wish to install it, consider a different type of border or “apron” around the heat source that will protect your floors from direct exposure to that heat. This border should be at least 18″ wide all the way around the heat source. Appropriate borders for use with your floors include tile and stone. By using this border, you’ll protect your wood flooring and prevent excessive drying, allowing your flooring to maintain its natural beauty for years to come.
How do I measure the apron area?
If your room has a fairly straightforward layout, it’s relatively simple to take out the 18″ border around your fireplace or wood stove. start the tape measure at the heat source and extend it out 18″ from there. If your apron is square, the corners may be farther away than the rest of the border; this is even better. You can also add a or t-molding to transition between the border surface and your floor. Remember that you’ll still need an additional 10% of your flooring to account for cutting and waste; adding a gap in your room means additional cuts to the flooring, which can lead to the need for additional boards.
What other problems are caused by heat and humidity?
Wood flooring naturally expands and contracts with changes in the weather. While this is not considered harmful, exposure to extreme temperature changes — for example, the ones that might be experienced around a wood stove or fireplace when you turn on the heat for the winter — can cause your wood floors to become damaged more quickly and reduce their usable life. Installing a border around these key areas can significantly help!
Since bamboo is made of natural wood, it expands and contracts naturally with temperature and humidity changes throughout the year. For this reason, you must do your best to maintain consistent temperature and humidity in your home throughout the year whenever possible. This may include:
- Installing a humidifier or dehumidifier, especially if some months in your city are considerably more humid or dry than others.
- Installing a thermostat that will keep your home a consistent temperature year-round.
- Keeping your heat or air conditioner running even when you’re on vacation. You don’t have to keep it set at exactly your usual temperature, but ensuring a consistent temperature throughout your home will extend the life of your floors.
- Keeping heat running in a seasonal home even if you’ll be spending your winter elsewhere. This is an added expense to your budget, but it will also help extend your home’s lifespan.
- Give your floors time to “acclimate” to the temperature and humidity inside your home before installation, then keep it consistent. This is particularly important if you install it at a time of year when temperatures outside are extreme, and you are relying on indoor air conditioning or heat to keep a reasonable temperature.
When you install flooring in your home it’s important to pay attention to the manufacturer’s recommendations. Most wood floors will naturally shrink as the temperature and humidity drop and expand as temperature and humidity increases. While gaps are left at the edges, usually covered by baseboards, those gaps may not be enough to keep up with extreme changes. As a result, you need to know what the manufacturer recommends temperature and humidity levels for your specific flooring so you can maintain your warranty and keep your home looking its best.

About the Author
Jen is your go-to guru for crafting a cozy, green cocoon. 🪴 Her dive into sustainable building wasn’t just about saving the planet—it started as a mission to make family movie nights eco-friendly (and to ensure the popcorn was the only thing getting heated!). With a knack for breaking down the jargon, Jen turns eco-lingo into everyday language. Swing by the Green Living blog for a mix of earth-loving advice and home improvement hacks. Whether you’re just dipping your toes into green waters or you’ve been swimming in the deep end of DIY projects, Jen’s here to guide, giggle, and remind you that every eco-choice is a step towards a planet that thanks you… and maybe even sends a rainbow your way! 🌈



I have engineered bamboo floors that were recently damaged by appliances being installed. There are several scratches in the kitchen and I have tried almost everything but nothing has worked. Any suggestions?
Hi Ava! If you’re experiencing only surface scratches then you could try a product called WearMax Scratch Concealer, or the Zenith Tibet Almond Stick. If the scratches are deeper then try a wax filler pen such as Mohawk Fil Stick or Picobello Floor Repair Kit. And as a method of last resort you can cut out the planks and replace them with new ones.
I have solid bamboo floors installed with 18 gauge cleats. They are buckling pretty badly in some spots. They were acclimated for 72+ hours and are not butting up against baseboards.
Any tips? And, how would you repair?
Hi Bradley! Sorry to hear you’re having problems, have you contacted the manufacturer of your floor, or your installer? Most buckling is caused by no expansion gaps being left around the perimeter of the installation (this is the responsibility of the installer). Buckling happens when humidity increases – hardwood/bamboo floors expand and have no space to go because they’re pushing up against an outside wall or at a doorway. This usually causes a few planks in the middle to “teepee.” If that’s not what’s happening then you might be experiencing cupping or crowning, and the causes for that can differ, from low-quality bamboo flooring to exterior causes related to moisture.
I installed some distressed antique java bamboo which was installed on a wood subfloor with a vapor barrier and nailed in. I am getting some bubbles in the floor what is the best way to fix these bubbles?
Hi Andrew! Sorry to hear that! Have you reached out to the manufacturer of your flooring about this issue? This can be the result of several things: defective finish, subfloor moisture, and others. We recommend you send photos of the issue to the manufacturer of your floor and ask them for advice. You could also hire an NWFA certified inspector to come out and determine what is causing the issue. Here’s a page where you can locate such an inspector.
I have a bamboo floor which was installed in Oct 2012. It has been glued down. Recently in the center of the room it has started buckling – teepeeing!!! What is causing this? There is absolutely no water damage of any sort. How can I fix this?
Hi Jane,
Oh no! First thing we would recommend you do is to call the manufacturer of your flooring to see if there are any known issues with that batch. Teepeeing can sometimes be caused by the floor swelling past the expansion gap around the perimeter. Once it has nowhere else to expand, it has no choice but to pop up. Also, occasionally high humidity can cause the flooring to hold more moisture so it might not be a bad idea to purchase a dehumidifier. Once the humidity drops, the flooring should settle back down. Hope that helps!
We recently got engineered bamboo floors installed and the person doing the job used a combination of glue and lacquer thinner. Now I am finding a lot of grimy, dirt-like spots all over that I have unsuccessfully tried to clean (it looks like a layer of dirt but no amount of scrubbing seems to help).
My question is, was the installer right in using lacquer thinner (for god knows what, I was not present at time of installation) and is there anything that can be done to clean this up? I’m rightfully very upset as the floors simply look dirty and this is not what I envisioned after spending thousands of dollars on getting this installed throughout the house.
Thanks for any and all feedback!
Hi Sam,
What a bummer! You might have already read this in the article, but any bit of the glue that cures on the surface of the flooring is extremely difficult to remove. Since everybody’s flooring is a little different and can have different types of finishes, we recommend you contact your flooring manufacturer and ask them what cleaners would be approved to try and remove that cured adhesive without harming your finish. Good luck and let us know if you are successful!
We had bamboo flooring installed approximately a year ago in our condo in Southern Florida. The boards are starting to separate from each other. Can this be fixed short of ripping up the entire floor? Was this an installation error? Installer is nowhere to be found!!
Hi Denise,
Oh no! I’m sorry to hear you are having issues with your flooring. We recommend reaching out to the manufacturer of your flooring to see if they have any advice to help close up those gaps. A good way to find out what is causing the issue is to hire an NWFA certified inspector to see if they can shed some light on things. Sorry to hear your installer is missing in action – I hope you get this resolved soon!
We had Cali Bamboo Hardwood floors glued down at the end of July. When we went to clean them the day they were finished installing them, we noticed a lot of marks all over the place. They look like surface marks. You can see them on the floor when its dried and they’re even more prevalent when the floor is mopped. I thought it was possibly from the boots of the installers, so I had them come back out. The installer used some type of cleaner to clean the floor; however, none of the marks came off.
Could this be a manufacturer problem with the bamboo itself? Thanks!
Hi Marie,
That sounds like a real bummer! First thing we recommend is that you reach out to the manufacturer and see what they have to say. You might have to send them photos of the marks as well as information on what was used to install and clean the floors.
Thank you for providing this article.People who owns a home who wants to use a bamboo flooring can definitely get inputs from here.
Thanks Joseph! We’re glad you enjoyed our article!
Hi ,and how are you? This article was amazing to read !i am about to purchase strand bamboo 3/8″ engineered fllors . I have a crawl space that is vented ,with about 3ft of space ,joist have no insulation but have an old thermal paper . Questions is will this be Adequate for insulation to stack and acclimate ?so long as input 6 mill or greater .!it is fall now here and is relativity drywith some humid day in summer …thanks for you time !
Hi Christian,
That’s a tough one and we’re unfortunately not able to give you customized advice for your specific project. It might be worth it for you to shoot an email to someone at the National Wood Flooring Associating to see if they have any recommendations. You could also consult a local installer to come out and take a look. Good luck on your project!
Question, we had a bamboo floor installed over a year ago and we haven’t seen any problems until now. We have on section of flooring that is starting to buckle. In the center of the floor, where two boards lock into each other is pushing upwards where it is maybe an inch higher than the rest of the floor. Is the floor too tight against the walls and has no room to move. What can I do to fix the problem.
Hi Jimmy,
We recommend that you reach out to the manufacturer of your flooring or the company that installed it to see if they have any suggestions. We can’t be sure, but it sounds like the floors have expanded beyond the expansion gap left by your installer, have hit a wall, and now have nowhere else to go but up! It could be caused by excessive humidity in the home, and if that is the case, you may want to invest in a dehumidifier to lower it back down to a reasonable level.
We are preparing to install 5/8″ solid bamboo flooring on a 3/4″ plywood subfloor. We got a noise reduction 1/16″ underlayment we plan to use, and a flooring nail gun with 18 gauge cleats.
When you talk about the temperature control system, are you just talking about the furnace? This home is in northern Michigan, and we have the furnace installed but haven’t had a humidifier put in yet. Sounds like maybe we should wait to get the humidifier in before acclimating the flooring or installing it? Also, when you say never turn the temperature control off, does that mean we can’t shut the home down in the winter time if we need to? Any other tips you may have will be greatly appreciated!
Hi Tim!
First, we recommended confirming with your bamboo flooring manufacturer that the noise reduction underlayment you have is appropriate for use with nail-down installations. We mention this because we advise our own customers who are nailing down our floors to only use 15lb. asphalt saturated felt paper (or red rosin paper), and do not recommend 2-in-1 or 3-in-1 underlayment under nail down floors. The latter can compress slightly when walked on, and the vertical flexion can result in loose nails and squeaky boards.
As far as temperature control:
While bamboo flooring can usually be exposed to cold weather for short periods of time (less than 24 hours) without problems, prolonged cold weather exposure is not recommended for bamboo or any other hardwood flooring. As a general rule, bamboo flooring will perform best when the indoor climate is maintained at around 40-60% humidity and 60-80 degrees Fahrenheit, although conditions may vary in different geographic areas. The acclimation process allows the natural material to adjust to it’s ‘new home’ (i.e. its surrounding environment), so it’s better to acclimate and install the bamboo flooring once the humidifier has been put in and the home is maintaining a humidity level in that 40-60% range.
Hardwoods left in cold weather (sub 40 degrees) for extended periods may result in face checking, shrinkage, and even cracking. However, as long as the indoor temperature does not drop below 45-50 degrees when you shut the home down in the winter, quality bamboo floors will hold up relatively well.
Hi, I installed a solid Bamboo floor that is a drop and lock system. It was done three years ago and was acclimated for 72 hours prior to install . Three years after the install the floor is shrinking. There are gaps in the width and the flooring has shrunk away from the baseboards. What causes this after three years?
Hi there, Mike!
If the floors were acclimated properly, the gapping may be caused by low or fluctuating humidity levels in your home. There is natural shrinkage and expansion that occurs with natural flooring materials, but if you are experiencing more than what is to be expected, you can look to your home’s interior humidity level and, if needed, set up a humidifier in the room where the bamboo flooring is installed to see if this helps reduce or alleviate the gapping. Keeping the humidity in your home within a 20% range (i.e. 35-55%) is the best medicine to keep your flooring looking healthy and beautiful and keeping the planks tightly ‘racked’.
The wood thresholds come loose from my bamboo flooring. Ordinary wood glue does not stick to the bamboo. What do you recommend?
Hi Lou!
Your moldings not adhering to the bamboo flooring may have something to do with the finish on either or both of the products. We’d recommend reaching out to the manufacturers of the moldings and flooring to see if they have suggestions for glues that may work better with their product.
As far as alternatives, the adhesives that we most often recommend to our customers for gluing down our moldings and trim pieces to bamboo flooring are Titebond Wood Glue and Liquid Nails Construction Adhesive.
Hello,
I installed my bamboo flooring about 7 years ago. Nail down over sub floor. Climate controlled area with long 30ft runs. This past year the popping and cracking has gotten really bad. I thought it was for the dryer air in the winter so I bought a whole house humidifier and have it set to 60% with no change. I only use bamboo floor cleaner. What else could I be doing to get this to stop.
Thanks for your help
Hey Jeremy, there can be a number of issues that cause this – run lengths, climate control, or even manufacturing errors. It is hard to determine the cause without a closer look at the product and the problem. We would advise to reach out to the manufacturer of your floors directly for deeper insight into what could be causing this problem. Best of luck getting it sorted!
Hi, We bought a manufactured home on the California central coast in January 2022 with beautiful wood flooring. The previous owner has since moved to Florida. We have no idea who did the original installation or where the flooring came from. Now we have an area of buckling in the living room/ dining area. A company has come out and says we have bamboo flooring. They have very few ideas of how to fix this issue. The wood runs are fairly long. The company removed baseboards to check the gap but still have no good ideas for us. Any suggestions would be helpful!!
Mary R
Hi Mary! We’re sorry to hear about the issue with your flooring. We have a few resources that should be able to help. First, our wood flooring cupping & crowning guide should give you a comprehensive look at the issue. We also have a separate blog post that goes into greater detail on whether you should repair or replace the damaged flooring. Replacement planks can often be reinstalled; however, given that you did not install the floor yourself, you may not have access to additional planks. Unfortunately, in many of such cases, the flooring will have to be replaced altogether. Take a look at these resources & let us know if there is anything else we can do to help.