Let's get down to the nitty gritty
Please note that the instructions on this page are meant to serve as a general guide only and are not complete. To download the full installation guide and requirements please click the button below
We've organized our Installation Instructions into three different pages. Click the link to view the appropriate page. If you have further questions please contact us.
Getting Started
It is up to the installer to determine where to lay the first row as it is dependent on the room layouts and how the flooring interconnects between the rooms. In the case that rooms are not square and corrections need to be made, the run can be broken at doors and a t-molding can be installed, then the run can be corrected. Some installations will begin in the middle of the room or middle of a hallway to ensure a straight line shot in a visible area. Other times the planks can be started square with the longest wall (parallel to the longest wall in the installation).
Remember to always leave 1/4" - 1/2" expansion space from base plate or wall. Ensure starter rows are firmly in place to hold succeeding rows. Establish a working line by measuring an equal distance from the wall at both ends and snapping a chalk line. This is usually the straightest and best reference for establishing a straight working line. The distance you measure from the wall should be the width of a plank plus about 1/4" - 1/2" for expansion space. If the outside wall is out of square, adjust your working line to make it straight for the rest of your installation.
**ABOUT INSTALLING SHOE MOLDING OR QUARTER ROUND: Due to the hardness of strand woven bamboo/eucalyptus, you will need to use a micro pin nailer to install most strand woven perimeter moldings. The recommended pin nailer will shoot 23 gage nails and these tools can be rented at most local big-box stores.
Nail-Down Installation
Please note all nail guns work with high density hardwoods such as strand bamboo, Brazilian Teak, Brazilian Walnut, etc. These woods are much more dense than traditional hardwoods and you may need to rent an 18 gauge nailer (see recommendations below), which can also be done by calling your Ambient representative at 301-498-0234.
- RECOMMENDED NAIL GUNS: Primatech Q550 ALR (pneumatic nailer)
- CLEAT SIZE REQUIRED: 18 gage, 1-1/2 inch or 2 inch lengths
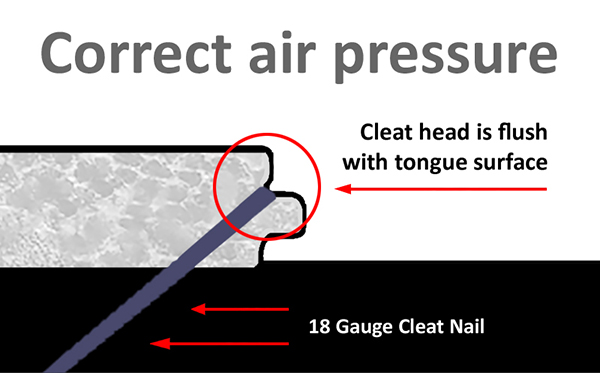
- RECOMMENDED PRESSURE SETTING: 90-120 PSI
BEFORE YOU BEGIN
- Ensure you’re using an 18 gauge pneumatic nailer. We recommend a Primatech Q550 ALR, but in some cases a Powernail 50P Flex may also work.
- Ensure that you are only using 18 gauge cleats (1 ¼” - 1 ½” recommended)
- Ensure the PSI setting on the nailer is high enough (90-120 recommended depending on the nailer).
- Ensure the air compressor, nozzle connectors and hose are all in good condition and there is no air leaking. Check for air leaks, wear marks, holes, etc.
- Ensure that the nailer is well-oiled and clean.
- As you begin, ensure the nailer is seated properly. (make sure you are not leaning the nailer forward, and are using the correct adapter plate)
ALWAYS practice on a few planks to ensure the correct PSI setting on the nail gun. As with all hardwoods there may be density differences between planks depending on the age of the plant and the density of the culm area of the plant being used.
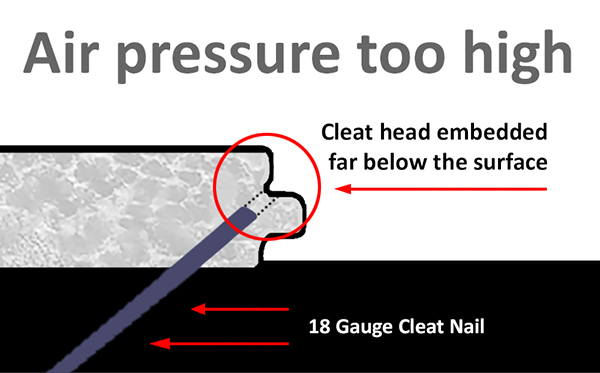
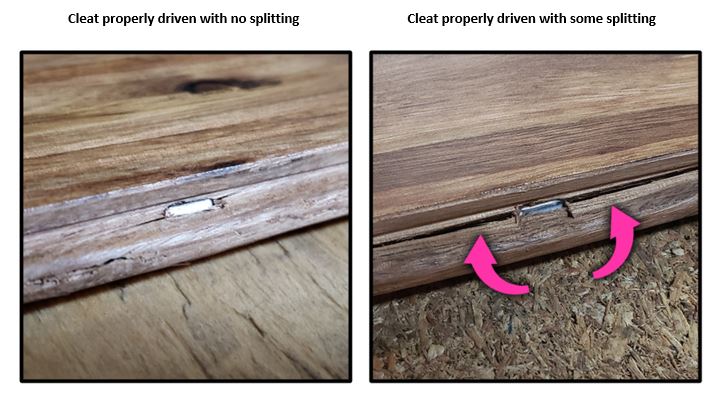
PROBLEMS IF NAIL GUN PRESSURE TOO HIGH: If the pressure is too high the nail will split the plank and the tongue may crack completely off. When using the mallet always use small, light taps - as opposed to large, forceful taps – this is the best to get a snug fit. Small splits are okay as long as they're on less than 30% of the cleats.
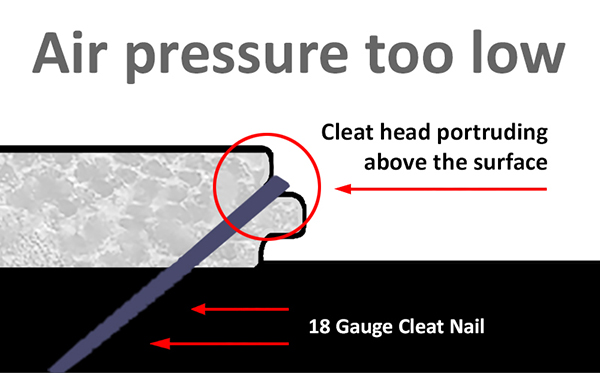
PROBLEMS IF NAIL GUN PRESSURE TOO LOW: If the PSI is too low you will end up with dimpling ("goosebumps") on the face of the floor. Always inspect for dimpling from a low angle and with backlighting after installing the first two rows, because it’s difficult to see when standing directly over the area. It is the responsibility of the installer to check each row after it has been nailed down to ensure all cleats are sufficiently embedded in the planks so they don't cause dimpling in the finished floor upon fastening successive rows.
Some splitting is acceptable. When nailing down extremely dense hardwoods like strand bamboo and eucalyptus there is a chance that the tongue on the planks will crack or split when the cleat is driven in. As long as less than 30% of the cleats have splitting around them, and the splitting is minor, this is perfectly normal and is not considered a defect (your floor will still be covered under the warranty) as the cleat is still firmly driven into the rest of the board keeping it securely in place. When splitting is happening try to use less force when striking the nailer with the mallet. Below is an image showing acceptable splitting, if occurring on less than 30% of the planks.
If a starter or finishing row cannot be nailed through the tongue at a 45 degree angle, they can be glued into place a 100% urethane adhesive, or by wedging, pre-drilling and screwing, or face nailing using a 23 gauge micro pin nailer. It is the installer’s discretion of what size drill and screws to use for pre-drilling. Installer will need to use matching wood putty to fill in screw holes, such kits can be found at the big box or local flooring stores (Picobello Floor Repair Kit or Timbermate are good fillers to use). Always test your methods on a sacrificial plank before continuing.
Ensure starter rows are firmly in place by gluing them down, wedging or face nailing. Once initial rows are secure, second and further courses should be blind-nailed directly above tongue at a 45 degrees to 50 degrees angle to the face. Fasteners should be spaced at 8" to 10" intervals with a minimum of six fasteners per piece. For wide plank products (four inches and wider) nailing every 6" to 8" is the standard. There should not be a fastener within three inches of each board end. It is recommended that you lay asphalt saturated felt paper underlayment No. 15 evenly over the entire subfloor following manufacturer's instructions.
We do not recommend 3 in 1 underlayments under nail down floors - only 15 lb felt paper or red rosin paper should be used.
Glue-Down Installation
Please note - if you are gluing down over concrete you must either seal the slab first, or use a glue that has a moisture barrier built into it (we recommend Ironwood All In One Wood Floor Adhesive with moisture & sound barrier). If you are gluing down to a plywood subfloor you can use a 100% urethane glue of our choice (we recommend Bilders Choice ZERO VOC).
Important: When applying adhesive that contains a moisture/vapor barrier to a subfloor, make 100% sure that you completely cover the sub-floor with the glue by applying only light pressure to the trowel at a 45 degree angle. Failure to apply an unbroken layer (full coverage) of glue to the subfloor may later allow moisture to penetrate and cup the floor.
- REQUIRED TROWEL OVER CONCRETE OR OTHER SURFACES RELEASING MOISTURE: V-NOTCH 1/4 inch
- RECOMMENDED TROWEL OVER DRY SURFACES SUCH AS PLYWOOD: SQUARE-NOTCH 1/4 inch wide X 1/8 inch deep
Additional tools you will need:
- Bilders Choice or Ironwood flooring adhesives
- Adhesive remover wipes
- 3M/Scotchguard #2080 tape
- Trowel (see recommended/required trowels above)
Important Glue-Down Clean-Up Note: Always test non-recommended cleaning agents on sacrificial planks or test planks of flooring before attempting to clean your newly installed floor with them, as they may cause blemishes in the finish. Ambient is not responsible for flooring damaged by adhesive that has cured or by cleaning agents. Cleaning agents must always be tested beforehand on a sacrificial plank to ensure that they do not damage the finish. For our polyurethane finish floors (not hardwax oil finish) we recommend Bostik Adhesive Remover Towels for removing adhesive from our floors. Note: if the adhesive cures it will be virtually impossible to remove, so please ensure that all adhesive is removed from flooring immediately. Do not use mineral spirits to remove adhesive from the bamboo flooring since it may dull the finish.
Adhesive must be 100% urethane. Ironwood All-In-One Wood Floor Adhesive is highly recommended. Read adhesive instructions carefully for proper trowel size and adhesive set time. Always leave a 1/4" to 1/2" expansion space between flooring and all walls and vertical objects (such as pipes and cabinets). Use wood or plastic spacers during installation to maintain this expansion space. Starting at an outside wall, spread as much adhesive as can be covered by flooring in one hour (or as recommended by the adhesive instructions). Spread adhesive with a trowel at a 45 degrees angle. When the ends of the plank come closely together, do not apply excessive force when tapping, since this could affect the finish. Small, light taps - as opposed to large, forceful taps - are best to get a snug fit.
When the first section is finished, continue to spread adhesive and lay flooring section by section until installation is complete. Remove any adhesive that gets on the flooring surface immediately using Bostik Adhesive Remover Towels (only for polyurethane finish floors, not hardwax oil finishes). Apply 3M tape perpendicularly to the seam of adjoining rows to prevent the rows from spreading apart while drying. Walk each section of flooring foot-by-foot, or roll with a 100-pound roller, within the adhesive working time to ensure solid contact with the adhesive. Flooring on the perimeter of the room may require weighting until adhesive cures enough to hold the boards in place. Do not place heavy furniture or appliances on the freshly laid floor for 24 hours.
Do not place heavy furniture or appliances on the freshly laid floor for 24 hours.
A note about pressboard: this is a fine particle board is a fairly common subfloor material, especially in older homes in California, particularly in the Bay Area. It's no good at holding nails or staples but great deal of flooring has been successfully glued over it. Of course it's always a good idea to re-screw it down to the joists and also to be sure crawl spaces have required vapor barriers. Most 100% urethane adhesives will work over pressboard.
Click-Lock Floating Installation
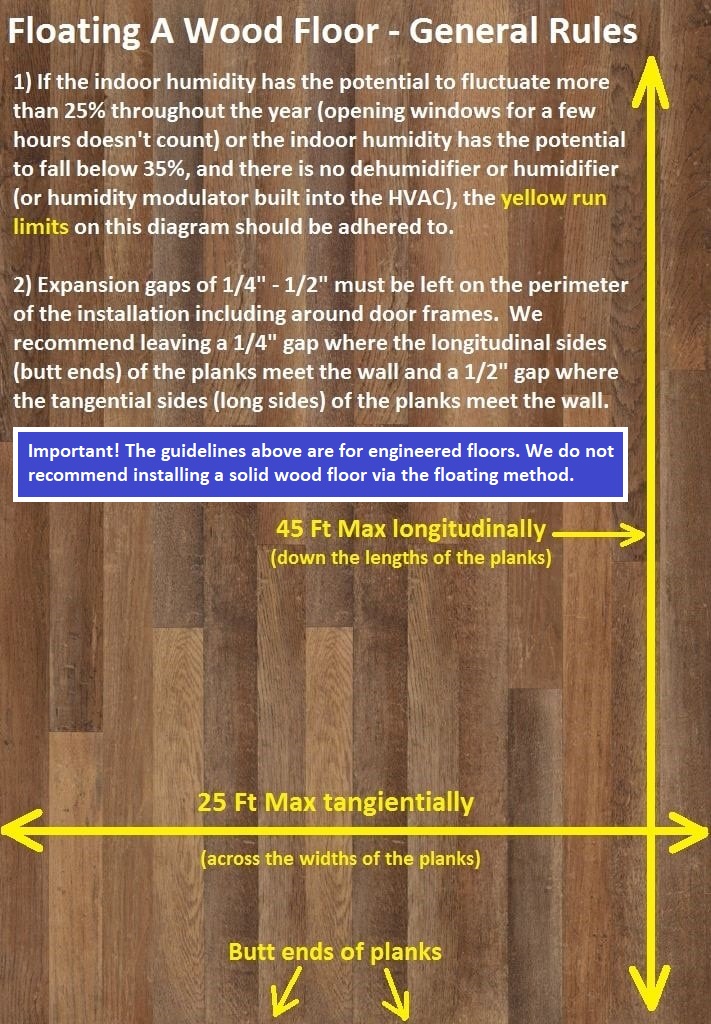
***IMPORTANT*** Unless your interior humidity settings are very stable (within a 20% range year around), the maximum successive "run" of flooring allowed for an engineered floating hardwood floor is 25 feet across the widths of the planks (tangentially) and 45 feet down the lengths of the planks (longitudinally), and for a solid floating floor it's 15 ft and 25 ft respectively. Be sure to insert breaks or expansion gaps (can be covered by T-molding) where the runs exceed these distances.
Ensure to leave at least a 1/4 to 1/2 inch expansion gap around the perimeter of the floor. It is recommended that you use a t-molding when transitioning into new rooms between doorways
Additional tools you will need:
- A suitable underlayment, preferably 3-in-1 closed cell IXPE foam underlayment with vapor barrier
- Duct or masking tape
Underlayment with 1 plastic side must be used when installing over concrete. Ensure to check the underlayment installation instructions as some underlayments are installed with the vapor barrier facing down, and others are installed with the moisture barrier facing up. Make sure the flat side of the roll is against the outside wall and the side with the excess plastic is towards the center of the room. Starting in a corner unroll the underlayment until it hits the far wall. Cut the underlayment leaving about ¼” between the underlayment and the wall. Roll out a parallel line of underlayment adjacent to the first roll. Cut at the wall and tape the entire length of the seam with duct tape. Note: When rolling out the adjoining length of underlayment be sure to overlap the plastic and tape foam to foam. This will prevent moisture from penetrating in between rolls. Do this for the entire room being sure to tape all seams. For ease of installation you can also tape down the perimeter of the underlayment to the subfloor.
Do not remove flooring from the packages until you are ready to begin installation. Removing the boards prior to acclimating the flooring could result in a difficult installation. Inspect each board before installation.
Start in the corner of the room with the locking edge open toward you and the L-shaped side toward the wall. Install the entire first row, clicking the end of each board and cut the last board to size. Be sure to leave 1/4"-1/2"-wide space between the floor and wall. You can use expansion shims at 12" intervals. For a better expansion joint, it is recommended that the tongue be sawn off of each plank along the wall. Start the second row with a cut piece at least 18" in length. You can also use the cut board from the first row. When installing the second row, insert the long edge of the board at a 20 degrees to 30 degrees angle, adjacent with the first row. Push forward and down at the same time, and make sure the boards lock together. You will often hear a clicking noise. At the end of each row, use a rubber mallet as necessary to ensure that all edges are tightly fitted together. Do not hit the boards with too much force as you may cause damage to the clicking mechanism.
After installing the third row make any adjustments necessary to straighten the floor as additional installed rows will make it harder to shift. Repeat the installation instructions above throughout the entire room until you've reached the last row. You may choose to do a random staggered pattern or a stairstep or bonded pattern. The last row will probably need to be cut lengthwise. To measure the last row, place a board directly on top of the last installed row of the boards. Scribe the row and cut to fit.
Transitioning between rooms where the connection is a doorway or narrow in width should always be done with care to leave an expansion gap, as this is a common site where pinning occurs. Narrow areas bridging two large floor expanses can create stress and fracturing in the floor.
Note: Do not set heavy appliances on top of a continuous floating floor. Instead, create an island of bamboo flooring underneath the appliance, and create a break in the flooring between that island and the rest of the floor this break can be covered by a t-molding.
Once your flooring has been installed, you can begin to use it immediately.
Installing Bamboo Flooring Over Radiant Heat Systems
Our 9/16” thick multi-ply engineered bamboo flooring is warranted over radiant heat, and must be used in combination with an IXPE closed cell 3 in 1 underlayment with a minimum thickness of 2mm. Our stone polymer composite (SPC) core wood flooring can be floated OR glued down over radiant heat. Eucalyptus floors are not warranted over radiant heat systems.
PLEASE NOTE: IXPE-backed flooring is not recommended for glue down installation and is not warranted if installed via this method; however, floors backed with cork underlayment are warranted for glue down installation.
RADIANT HEAT GUIDELINES - PRIOR TO INSTALLATION
- Six (6) days prior to installation, the temperature of the radiant heat system should be set close to or at its maximum temperature and kept hot for 72 hours. This is very important because it allows enough time for any remaining moisture to evaporate from the system, attaining its final moisture content.
- At least 72 hours before installation, the heating system must be reduced to a suitable temperature of at least 65 degrees Fahrenheit. If the temperature of the surface slab is below 65 degrees Fahrenheit, the adhesive bond will be affected when the floor is installed by glue-down method.
- The flooring must be acclimated over the radiant heat with the system turned on. The same acclimation preparation must be followed as always, including cutting the boxes open and stacking them as prescribed in the Acclimation section of this document. If the radiant heat system is encased in concrete or another substrate that releases moisture, a 6mm polyethelene barrier must be placed between the flooring boxes and the substrate so that the flooring does not absorb moisture during acclimation.
RADIANT HEAT GUIDELINES - DURING INSTALLATION
- Make sure to leave 1/4" - 1/2" of expansion space between the flooring and the walls.
- The temperature of slab should always be maintained at a minimum of 65 degrees Fahrenheit.
- A stove or any other item that can affect the temperature of the ground should not be used at the job site.
RADIANT HEAT GUIDELINES - AFTER INSTALLATION / MAINTENANCE
- During the first three days after installation, the concrete slab temperature should be maintained at a minimum of 65 degrees Fahrenheit. After that, the temperature can be set warmer, by 1.5 degrees Fahrenheit each day, with a maximum temperature of 85 degrees Fahrenheit.
- The temperature of the sub-floor must never exceed 85 degrees Fahrenheit and the radiant heat system liquid must not reach more than 112 degrees Fahrenheit during the life of your floor.
- When turning off the radiant heat system, it must cool by a temperature of 1.5 degrees Fahrenheit per day.
- Never turn your radiant system off suddenly.
- The radiant heat system cannot fluctuate in temperature rapidly. Room temperature should vary no more than +/-7 degrees Fahrenheit year round.
- Slight changing of color is expected for bamboo flooring installed over a radiant heating systems.

