If you’re looking to install eco-friendly bamboo flooring in your home or workplace, you’ll probably come across frequent references to the baseboard and shoe molding (or its close cousin, quarter round). These products are essential for creating a perfectly finished look for your floors.
We’ve put together a list of answers to some frequently asked questions about installing bamboo floor moldings and trim, baseboard, shoe molding, and quarter-round when wrapping up your flooring installation.

Why Do I Need Baseboard and Shoe Molding For My Bamboo Floors?
Shoe molding and baseboard moldings are more than just a pretty face. It’s important to leave an expansion gap of at least ¼ – ½ inch around the perimeter of your floor when installing hardwood flooring because all wood expands and contracts with the seasons. This includes around all solid fixtures such as kitchen islands and wall columns, and door frames. The gap allows the flooring to expand and contract with different temperatures and humidity levels.
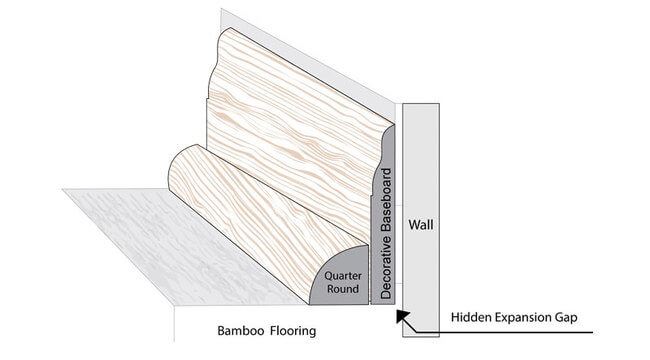
Baseboards (aka wall base) are decorative accessories installed around a room’s perimeter to hide the expansion gaps. They’re often paired with quarter round or shoe molding to ensure those gaps are completely hidden. If you’re installing bamboo flooring in a newly built property, then baseboards may be all that you need to cover the gap fully.
For renovation projects, you may find that the baseboard is already installed before fitting the floor. In these cases, the expansion gap will sometimes be between the baseboard and the flooring edge. Shoe molding (aka quarter round) is used to hide this gap in the most discreet and visually pleasing way possible.
Here’s a diagram that slows how baseboards and moldings are applied to hide the expansion gap:
What Do I Attach the Shoe Molding and Baseboard To?
Always affix the baseboard to the wall and the shoe molding to the baseboard. Neither should be attached to the floors. If you attach them to the floors, they’ll stop the floor from expanding and contract – defeating the whole purpose of leaving an expansion gap, to begin with. If you make the mistake of attaching shoe molding to the floor, you may even find it comes away from the baseboards as the floor tries to contract, leaving a gap between the floor and the wall. Remember, bamboo, and hardwood floors need space to breathe, as they change shapes slightly during seasonal cycles.
Should I Nail or Glue Them?
There is no doubt you have already decided between nailing vs. gluing vs. floating a bamboo floor, so now, deciding whether to glue or nail your moldings will come down to your personal preference. However, we tend to prefer nailing for various reasons.
One of the key benefits of nailing your baseboards and moldings is that they can be easily removed again if you need to carry out work on the walls or floor. It’s tough to remove the molding that’s been stuck on with glue unless you’ve used glue specifically designed to allow for disassembly. After all, the whole point of glue is that, well…. it sticks!
We suggest avoiding using glue on any areas you may need to service or refresh in the future. If you do, you risk having to destroy the baseboard, wall, and flooring if that molding ever needs to be removed.
A top benefit of nailing baseboards and moldings is that the attachment is complete as soon as the nails go in. You may have to wait hours for it to fully dry with glue, depending on the type of adhesive you choose. If you leave the walls alone before the glue is sufficiently set, you risk the boards slipping out of place and the glue drying them ‘wrong’ on the walls. This can be a nightmare to fix, and you risk damaging your walls when trying to remove the incorrectly placed moldings.
If you nail your baseboard in the wrong place, it’s fairly easy to remove the nails and re-position it. Gluing offers a greater risk of mistakes, which are often harder to correct. If you spill the glue or add too much and cause it to run or seep out between the boards, this is also very difficult to fix.
You may have trouble getting glue to stick effectively if you’ve painted your moldings to suit the color scheme of your room better. Nails don’t have that problem – they punch straight in!
Many people believe that gluing is a better method for attaching the baseboard since it doesn’t affect the molding’s design because the adhesive can’t be seen from the front. If you’re also thinking along those lines, it may help you to know that micro-thin nails are hardly visible either, especially if you caulk or paint them afterward. There are also nails you can purchase that have whiteheads, which makes them less visible.
What Tools Do I Need?
Installing bamboo or eucalyptus strand trim pieces with a nail gun can be more difficult than trim pieces made of other materials. If you’re having issues with bending nails, pre-drill a pilot hole using a drill bit that’s slightly smaller than the nails.
Alternatively, give up the drill and nail your baseboard the easy way! We suggest using a micro-pin nail gun such as the Bostitch Porter Cable 23 GA gun with a 1″ long micro-thin nail. These can be rented from the big box stores or purchased directly from Bostitch or online at Amazon or similar sites.
Nail guns make installing baseboards very quick and simple – you’ll have the job finished in no time!
I’ve Decided To Glue. Which Glue Do I Use?
If you decide to glue your baseboard and molding, we recommend Gorilla Glue, Titebond molding glue, or Liquid Nails. Gorilla Glue will set pretty quickly, making your installation a bit less painless. Otherwise, look for urethane-based glue for optimum adhesion and to avoid damaging your floors.
Do not get glue on the surface of the floor, as it may damage your finish irreparably if it dries.
At Ambient Bamboo Floors, we’re proud to stock the web’s largest selection of bamboo flooring & moldings. Our color matching service allows you to mail us a 5-inch sample of your floor so that we can recommend a product that matches.

About the Author
Jen is your go-to guru for crafting a cozy, green cocoon. 🪴 Her dive into sustainable building wasn’t just about saving the planet—it started as a mission to make family movie nights eco-friendly (and to ensure the popcorn was the only thing getting heated!). With a knack for breaking down the jargon, Jen turns eco-lingo into everyday language. Swing by the Green Living blog for a mix of earth-loving advice and home improvement hacks. Whether you’re just dipping your toes into green waters or you’ve been swimming in the deep end of DIY projects, Jen’s here to guide, giggle, and remind you that every eco-choice is a step towards a planet that thanks you… and maybe even sends a rainbow your way! 🌈


